Vermont's Independent Voice
Browse News


Browse Arts + Culture


Browse Food + Drink


Browse Cannabis


Browse Music


Browse On Screen


Browse Events


Browse Classifieds
Browse Personals

Published September 17, 2014 at 10:00 a.m.
Nothing kills the look of a bedroom like clothing clutter. I'm just as guilty as the next person of tearing through drawers looking for one specific thing, and hurrying out the door, leaving the mess right where is fell — for days.
OK, so some people are more inclined to have messy bedrooms than others. In my defense, though, it's been a while since I've had a proper place to store my clothes. As most people who live in dormitories or shared living quarters know, all rooms are not created equal, and it can be tricky to figure out who gets which one.
There's the room with the view; the room with the private bathroom; the room with the exposed brick wall; and the room with the big, walk-in closet. Or, in the case of the dwellings that my roommate and I have recently occupied, the room with the only closet. (She always gets the closet. Her clothes are way nicer.)
When moving day came around at the end of August, I packed my bags, loaded them into a big yellow Penske truck and vowed that this time would be different. Our new place is way more spacious than the fairly cramped apartment we were leaving behind. But — whaddaya know? — it also has only one bedroom with a closet.
Determined to solve this major household crisis of my youth once and for all, I did what any self-respecting twentysomething would do: I logged on to Pinterest.
Predictably, those crafty folks on the internet had a ton of do-it-yourself suggestions for those of us who'd run out of room in our closets, or simply didn't have one. If the Pinterest pros were to be believed, a range of simple, foolproof options for attractive, stand-alone closets were at my fingertips.
A standing closet, I read, could be made from just about any frame. The slacker in me was tempted to just hang a pole in the corner (made from a hand-chopped birch sapling! With twine! From antique ceiling hooks!), and maybe stack some milk crates (antique, wood, with original ink lettering) underneath it for shoe storage. But I decided to challenge myself with a more involved project.
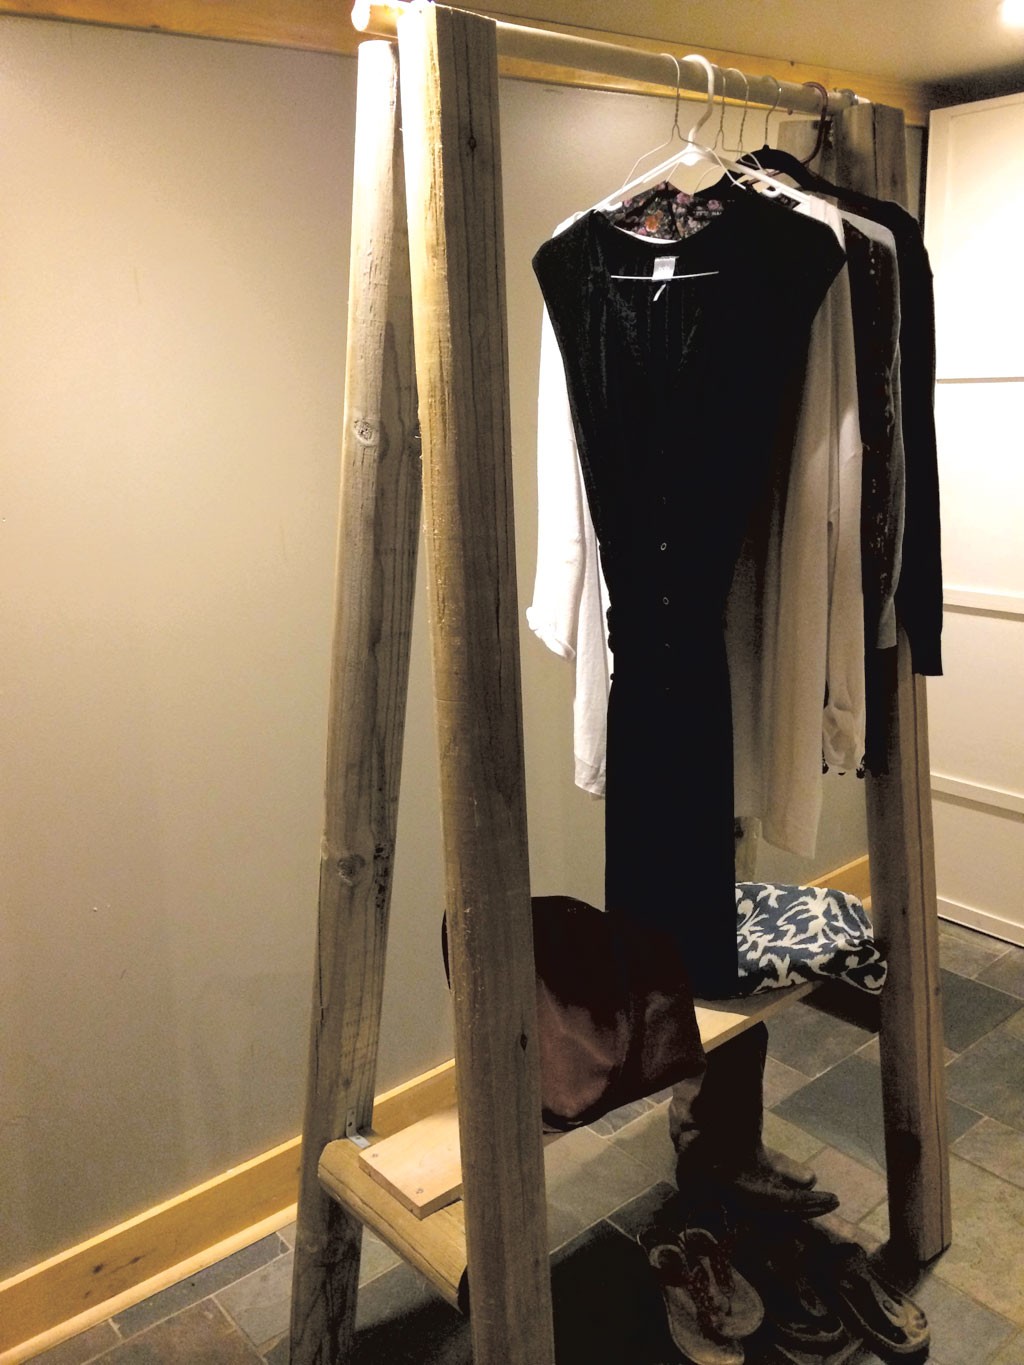
One standing closet in particular caught my eye: a frame made from two antique wooden ladders, connected by a closet rod fastened with pipe straps on the top rung, and simple plywood boards resting on the bottom rungs for shoe storage. I liked the clean lines, the reasonable size, the rustic look and that there weren't many steps or materials to figure out.
That Pinterest DIY-er made it look so easy, but my experience turned out to be a bit more complicated. I searched the Burlington area for an affordable antique wooden ladder, but it turns out antique wooden ladders are kind of a thing. They're hard to find, and when you do find them, they're a little on the pricey side. (That means out of budget for those of us closet-less plebes still splitting the rent, at least.)
Plenty of home stores have an appealing range of well-designed standing closets, but at that point, I was determined to hang my clothes on something I'd made myself. So I took matters into my own hands — or rather, into the hands of the good people at Home Depot in Williston. And it turns out that those DIY bloggers were right about one thing: You can make a functional standing closet frame out of just about anything.
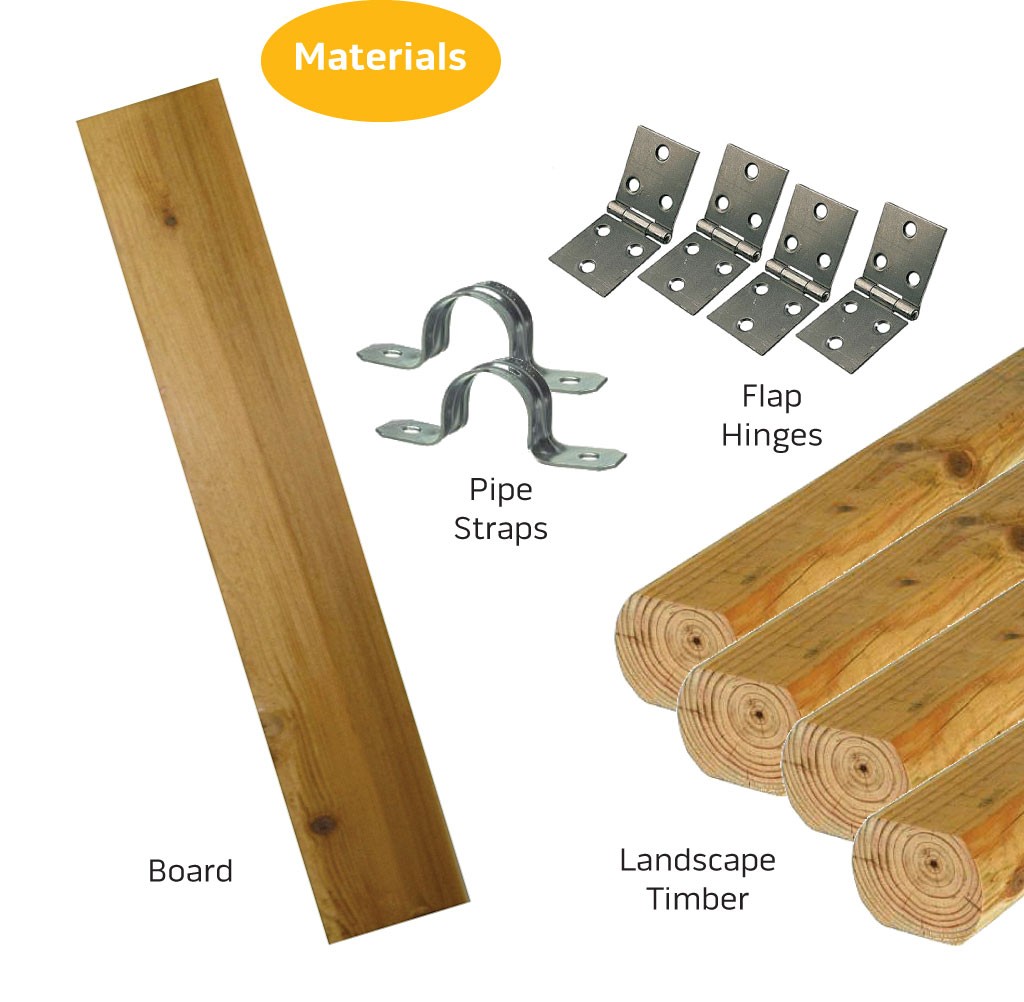
At the store, I chose four pieces of rough, six-foot-tall landscape timber (at $5 a pop, these were a low-risk option), which sort of had the rustic look of the antique wooden-ladder frame, without the clean lines and charmingly spattered white paint. At any rate, they were more interesting than two-by-fours.
At a friend's suggestion, I didn't try to recreate the ladder, but made the ends of the frame by "tenting" the tops of the wood toward each other like a swing set — a more structurally sound shape, I'm told.
Each set of two pieces of timber was attached at the top with back flap hinges ($2 each), and again a foot or so off the floor by a one-foot piece of wood. I used pipe straps to fasten a wooden dowel ($3, and you can use any branch, broomstick or rod) to the top, where it rested neatly in the angled groove of the hinges where the lumber pieces touched.
As a finishing touch, I ran a board across the one-bys at the base for a shoe shelf, and — voilà! — I'd made my own standing closet, in less than an hour and for less than $30.
The original print version of this article was headlined "Wardrobe Triumph "
More By This Author


About The Author

Xian Chiang-Waren
Bio:
Xian Chiang-Waren was a staff arts writer at Seven Days from 2014 to 2015.
Xian Chiang-Waren was a staff arts writer at Seven Days from 2014 to 2015.
Speaking of...
-
Nest — Spring 2024
Apr 16, 2024 -

Original Glory: A Five-Year Renovation Turns Charlotte's '1812 Tavern' Into a Stunning Family Home Steeped in History
Apr 16, 2024 -

Home Is Where the Target Is: Suburban SoBu Builds a Downtown Neighborhood
Apr 16, 2024 -

A Room of Her Own: In Shelburne, a Backyard Cottage Provides Both a Haven and a Gathering Place
Apr 16, 2024 -

An Earthship-Inspired Greenhouse in Johnson Lets the Sunshine In
Jan 16, 2024 - More »
Comments
Comments are closed.
From 2014-2020, Seven Days allowed readers to comment on all stories posted on our website. While we've appreciated the suggestions and insights, right now Seven Days is prioritizing our core mission — producing high-quality, responsible local journalism — over moderating online debates between readers.
To criticize, correct or praise our reporting, please send us a letter to the editor or send us a tip. We’ll check it out and report the results.
Online comments may return when we have better tech tools for managing them. Thanks for reading.