Vermont's Independent Voice
Browse News


Browse Arts + Culture


Browse Food + Drink


Browse Cannabis


Browse Music


Browse On Screen


Browse Events


Browse Classifieds
Browse Personals


Published April 4, 2017 at 10:00 a.m. | Updated April 4, 2022 at 8:06 p.m.

I have a confession: I've lived in Vermont for more than a dozen years, and I don't know the first thing about gardening. In summer, I'm green with envy looking at friends' Facebook and Instagram photos of their kids frolicking among backyard garden beds, cradling homegrown cucumbers and picking plump tomatoes right off the vine. Every year I think to myself, I'm going to learn to grow my own bounty one day.
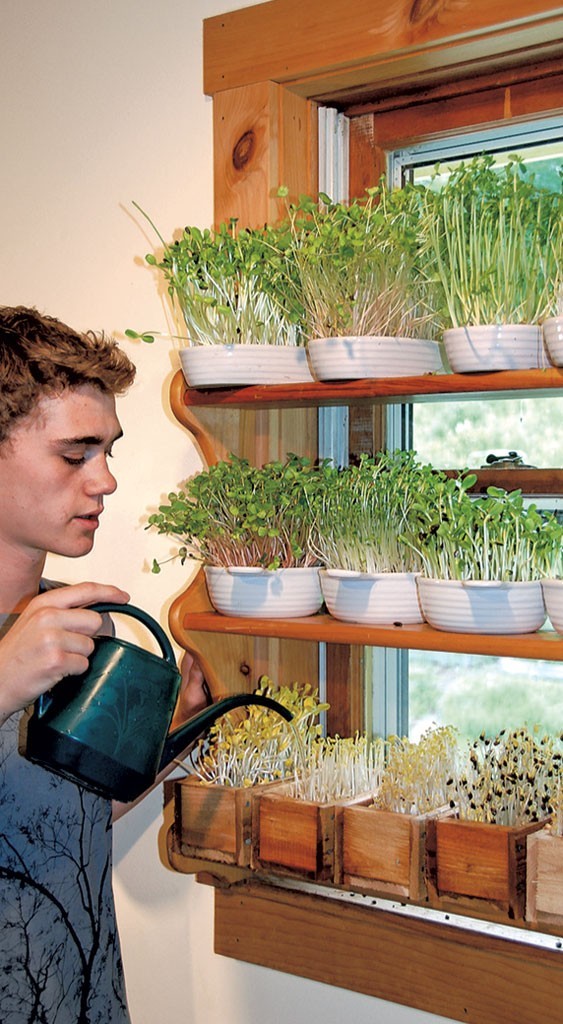
That idea has yet to germinate. But in February, I took a baby step toward earning my green thumb. My 9-year-old daughter, Mira, and I signed up for an indoor salad-growing workshop at Shelburne Farms. Calais resident Peter Burke — author of Year-Round Indoor Salad Gardening, published in 2015 by Vermont-based Chelsea Green Publishing — taught the class. He took Mira and me, plus several other parent-child pairs, through the surprisingly simple process of growing soil sprouts, which take only a week to mature and can be thrown into salads and stir-fries, used to garnish a sandwich, or nibbled for a healthy snack. There are all different sprout varieties; Burke favors sunflower, radish, buckwheat, pea and broccoli.
The lifelong gardener and father of five adult children started growing sprouts indoors in the winter of 2005, driven by the desire to have fresh salads year-round. Not only does his simple method yield crisp, crunchy greens, but it's cost-effective. In his book, Burke explains that growing your own sprouts costs roughly $2 a pound, whereas buying them at the market can set you back between $10 and $23 a pound.
Burke's motto is, "You can't mess this up." Following his process, Mira and I grew tasty pea shoots on our windowsill in about a week. If even this inexperienced gardener can do it, chances are it will work for you as well.
Supplies for sprouting
For 5 trays of greens:
- 5 small trays, (3 by 6 inches, 2 inches deep). Half-loaf foil baking trays work well.
- 1 tablespoon of seeds for each tray. You can purchase them on Burke's website, the Daily Gardener or through Wolcott-based High Mowing Organic Seeds. Make sure you get seeds for sprouting rather than garden seeds.
- 1 gallon standard potting soil (with no added chemical fertilizer)
- 5 tablespoons manure compost
- 3 teaspoons dry kelp meal (find it at your nearest Agway or online)
- Newspaper (paper towels, napkins or packing paper also work)

Growing Your Greens
Soak: Submerge the seeds in water for at least 6 hours, or overnight. Meanwhile, add 4 cups of water to your potting soil and set aside. Fold newspaper to a size just a bit bigger than your trays. When seeds are ready to plant, soak your newspaper in water.
Sow: In the bottom of each tray, mix 1/2 teaspoon kelp meal and 1 tablespoon of compost. Fill the trays with about 1 1/4 cups of the moistened potting soil. Level the soil, leaving 1/4 inch to the rim. Drain water from seeds, then spread one tablespoon of seeds over soil, so seeds touch but don't overlap (no need to bury them). Press soaked newspaper into each tray so it touches the seeds.

Grow: Place planted trays in a warm, dark place — like a cabinet drawer — for 4 days. On day 5, remove the newspaper, water the trays and place them on a well-lit windowsill. Once a day, water with 2 to 4 tablespoons water per tray.
Harvest: After 3 to 6 days, harvest the shoots by cutting the stems with scissors about 1/4 inch above the soil surface. (Radishes are the quickest; broccoli takes the longest. Don't wait too long to harvest or the shoots may become tough or bitter.) Gently wash harvested greens.
Eat: Chop greens into 1/4- to 1/2-inch pieces and toss in a salad, sandwich or stir-fry. Put unused greens in a plastic bag or sealed container and store in the fridge. They'll stay fresh and crisp for up to a week.
This article was originally published in Seven Days' monthly parenting magazine, Kids VT.
Related Stories

More By This Author


About The Author

Alison Novak
Bio:
Alison is the former managing editor at Kids VT, Seven Days' parenting publication and writes about education for Seven Days.
Alison is the former managing editor at Kids VT, Seven Days' parenting publication and writes about education for Seven Days.
Speaking of...
-
Vermont Restaurateurs Add Vegetable Production to Their Long To-Do Lists
Jul 25, 2023 -

Lawmakers Approve New Pesticide Rules for Vermont
Jan 19, 2023 -

Three Specialized Vermont Seed Companies Offer the Means to Make Your Garden Grow
Jan 10, 2023 -
Designing Dinner: Lessons From Ellen Ecker Ogden's Kitchen Garden
Jul 5, 2022 -
Age of Asparagus: Planting for the Future as a Link to the Past
May 31, 2022 - More »
Comments
Showing 1-1 of 1
Comments are closed.
From 2014-2020, Seven Days allowed readers to comment on all stories posted on our website. While we've appreciated the suggestions and insights, right now Seven Days is prioritizing our core mission — producing high-quality, responsible local journalism — over moderating online debates between readers.
To criticize, correct or praise our reporting, please send us a letter to the editor or send us a tip. We’ll check it out and report the results.
Online comments may return when we have better tech tools for managing them. Thanks for reading.